
Level Designer
"Designing light-hearted experiences full of wonder and joy in worlds that feel alive"
"Grim Repo"

// Click here to download on Steam!
Project Summary
Role: Level & Quest Designer
Genre: Survival Horror
Editor: Dying Light Developer Tools
Platform: PC
Process: Level Design Document, Map Diagram, Whitebox, Gameplay Iterations, Aesthetic Pass, Launch
Development Time: 3 months (15hr/week)
The Project: (2022)
“Grim Repo" takes place in the slums of Haran, a fictional city in the game Dying Light. The player is tasked with repossessing a stolen airdrop stashed at a nearby workshop. As a side quest, the player can search the premises to locate a grim looking sickle.
Focus: Environmental Storytelling, Engagement through movement and interactables

Postmortem
WHAT WENT WELL
-
I scoped this project appropriately and because of that, I was able to hit all milestones with ease.
-
The metrics in my map diagram in preproduction were almost exact allowing for implementation of a whitebox level to be a breeze.
-
On top of learning a brand new editor, I was able to script a basic side quest which was significantly more challenging to figure out than in other editors and engines.
-
I was able to lean into environmental storytelling and create beauty corners.
-
I was able to implement numerous dynamic assets to make the level feel exciting.
EVEN BETTER IF
-
I did not spend time adequate time in the beginning of this project to see how to properly group things together or utilize the layer system to its fullest extent. This could have saved me time and allowed me to expand on the parkour gameplay in the exterior space. In the future, I would probably do this before implementing in engine.
-
If I could change anything about the project, I would go back and adjust the workshop lighting more, enhance the npc animations, and correct a small scripting bug. I'd also be interesting in adding back more enemies; this had to be cut back due to performance concerns and deadlines.
-
If I had more time for the overall project in general, I'd add a small city segment between the quest giver and the workshop yard to allow the player more parkour opportunities (as in the vanilla game), and I'd create an additional path into the workshop via the roof.
WHAT I LEARNED
-
Scripting in this editor worked very different than other engines I had used before. In order to be successful, I had to become an expert problem solver. I sought out the few tutorials there were, and I worked alongside some peers to see how they were doing certain things with their projects.
-
I discovered two wikis for the map editor and a Discord server of modders for Dying Light. In the end, communication with others and sharing resources with others helped a ton. I also contributed my own tutorial to the wiki and helped others as I could.
-
I reviewed other projects’ code to see how they were using various phases and blocks of code to achieve their results. Through this, I was able to identify syntax patterns and used this knowledge as a jumping off point to create new code segments with similar code structures in my own project.
Design Overview
My design process started with top down map diagrams and a level design document (LDD). The full LDD can be downloaded here.
The level design document included many sections: map layouts, gameplay breakdowns, hooks, the backstory, level context, art references, a risk analysis and the steps I took to mitigate those risks, and a development schedule.

For the overview map, the circles that have letters in them represent narrative beats and sections of gameplay, and these correspond to a chart just below the map in the level design document.

A more in-depth breakdown of what would be included in the exterior area. The breakdown included npcs, enemy types, combat style, and the placement of weapons, ammo, health, and other loot. I noted conveyance techniques used in the space and anything that should call the player's attention or be considered a wow moment. I labeled each enemy with the letter corresponding to the narrative beat or gameplay section they were a part of, and a number identifying which enemy they were in the section.

As I moved into the whitebox stage of development, some changes were made to the gameplay and level geometry, but I was able to keep the final project close to the original plan.
For the overview map, the circles that have letters in them represent narrative beats and sections of gameplay, and these correspond to a chart just below the map in the level design document.

This zoo contained every asset I could find that fit the theme of workshop, warehouse, shipping container yard, slums, or city. As I found pieces that went well together, I put them near each other in groups. Later I experimented with mod kits to see how they connected and what materials could be swapped out. This zoo served as a reference when I needed to find the name of an asset in a list; I simply flew over the assets until I found what I needed and hovered over it to get the name.

I created this zoo to specifically see how to kit-bash objects together to make storage units.
This zoo contained every asset I could find that fit the theme of workshop, warehouse, shipping container yard, slums, or city. As I found pieces that went well together, I put them near each other in groups. Later I experimented with mod kits to see how they connected and what materials could be swapped out. This zoo served as a reference when I needed to find the name of an asset in a list; I simply flew over the assets until I found what I needed and hovered over it to get the name.
Another thing I died before implementing anything into the map, was create a couple of zoo levels to experiment in. In one zoo level, I kit-bashed objects together to see if I could construct something that would look like a storage unit. In the other zoo level, I sifted through all available assets to see what kits would work best for the various areas I wanted to create. I would drag in every piece that made sense, and see how they connected together. This was an enormous time saver while I was constructing my map.
Design Goals
Simple, Smart Design.
5-7 min of Gameplay
Optional
Side Quest
Aesthetic Detail;
Environmental Storytelling
Simple, Smart Design.
5-7 Minutes of Gameplay.
[SIMPLE QUEST DESIGN]
This quest is simple because I intentionally scoped it down to allow for troubleshooting and learning; this is the first quest I made in this map editor, and it had a high learning curve. I aimed for bug-free, fun gameplay, and aesthetic appeal over complexity and large scale.
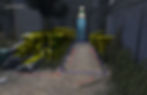
The player begins the map on the streets outside of a workshop and chats with a quest giver. Here, I was intentional about framing the quest giver and later goals in the quest such as entering the workshop in the background.

This is the player's starting perspective. Their immediate goal is in front of them (quest giver), the workshop is in sight (where they need to head to), and the gate to enter the yard is in view off to the side if the player follows the road. Zombies are also visible through the fence.


This is the player's starting perspective. Their immediate goal is in front of them (quest giver), the workshop is in sight (where they need to head to), and the gate to enter the yard is in view off to the side if the player follows the road. Zombies are also visible through the fence.

The player only has melee weapons in the first part of the level.

I designed circular flow in the yard by strategically placing vehicles, pipes, pallet stacks, trash bins, and shipping containers.

One thing that separates Dying Light from games like Fallout 4 is that the rest of the game does not stop while the player is picking locks. It is fully possible to be attacked while picking a lock. This door is locked on purpose and only accessible via lockpick to ensure the player actually spends time in the yard searching for a lock pick and facing the zombies. The player only has melee weapons.
The player only has melee weapons in the first part of the level.
The player then moves through the workshop yard avoiding or slashing slow-moving, but abundant, zombies (that cannot climb) while collecting weapons, ammo, and other loot. The yard is strategically setup to allow the player to parkour over and between shipping containers, vehicles, and large pipes. This verticality encourages circular flow and utilizes a core mechanic in Dying Light.
Once the player makes it through the yard, they enter the workshop using their lockpicking skills -- unless they find the secret access card.
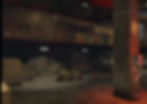
Once in the dimly-lit workshop, the player navigates to the back of the building with a shotgun to locate a circuit box. The workshop is designed to limit sightlines and cause jump scares as zombies pop out from around corners in short-range combat.
Once the circuit box has been activated, the player finds a way into the the storage unit in order to retrieve a stolen airdrop and obtain a rifle. As the player is leaving, the bandits return to find the player repossessing the airdrop.

The player enters the workshop and must find the circuit box on the pillar at the back of the warehouse. Framing, leading lines, color contrast, and animations help to convey its location to the player.

The workshop is intentionally crowded with shelving, pallets, and boxes to limit sightlines and make it challenging to see just how many zombies are in the workshop.

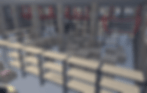
Inside the unit, the player can obtain a rifle. Upon exit of the unit, the player can clearly see the catwalks above which will be helpful in the firearm combat between the bandits moments later.
The player enters the workshop and must find the circuit box on the pillar at the back of the warehouse. Framing, leading lines, color contrast, and animations help to convey its location to the player.


Once the airdrop is repossessed, the player fights their way back through the workshop, yard, and side alley to return to the quest giver and map start location. Instead of close-quarters, melee combat and avoidance, this combat is medium-ranged, full of verticality and use of cover, and allows the player to take advantage of explosives.
[LEVEL DESIGN]
Whenever possible, I try to make things as interactable as possible in my levels; one of the first things I did in the planning stages of development was hop into the editor and sift through all of the destructible meshes, cinematic assets, animated materials, and trigger-related, interactable objects to see how I could design a level using as many of these as possible. By designing my level with these assets in mind from the start, most interactive or animated elements in my level also have a gameplay purpose by design and are not just for decoration, and the level feels more immersive.

In some cases, glass can be broken with the player's machete to enter a container or other point of interest (POI) with loot. In any case where this occurs, I framed the loot in view from outside of the glass.

Active fire hazards were placed near vehicles on the streets. I placed visible loot (i.e. wallet with cash, different melee weapon, etc.) inside the hazards to give the player risk/reward choices.
In some cases, glass can be broken with the player's machete to enter a container or other point of interest (POI) with loot. In any case where this occurs, I framed the loot in view from outside of the glass.

I was also conscious of my level's performance. Some of the things I did to compensate for performance:
-
Added occlusion parameters to large walls, solid fences, and props.
-
Removed extra particle systems that did not enhance gameplay or only minimally enhanced aesthetics
-
Adjusted LOD parameters for mesh assets
-
Scripted all ai to enable and disable so that they were only visible to the player when they had to be.
-
Destroyed trigger boxes and checkpoints after their use was no longer required.
-
Kept the map space small and designed wisely with reuse of space.
I wanted to make sure that the player always knew where they were in the level. So, I was sure to make sure different areas stand out from each other and not look samey. Some of the ways I accomplished this were:
-
Orange shipping containers near the front of the yard and blue containers near the workshop
-
Vans and large bay doors at the front of the workshop
-
The giant bandit flag on the front of the building
-
The car accident by the quest giver with the billowing smoke and body
-
Multiple points of interest for exploration

Point of Interest Exploration Areas

Point of Interest Exploration Areas

Point of Interest Exploration Areas
Point of Interest Exploration Areas
To make the level feel bigger than it actually was, I made sure to reuse space and to create lot of nooks and crannies that the player could explore off of the critical path.
The entire level is essentially reused at least once. The player starts on the street, treks through the yard, fights their way into the workshop, fights their way out of the workshop, fights their way back through the yard (or alley), and finishes the quest back on the street.
[CONVEYANCE]
The player needs to walk through this door to progress the quest. I used contrasting light on the workshop door to call attention to it. I also funneled the player into a pathway to the door (yellow is collision); this made it feel scarier to players also as they lockpicked since a zombie might approach them from behind in a narrow space.

As the player walks into the yard, one of the first things they would see is a massive yellow flag, with the bandit logo, on the workshop flapping in the wind. The logo itself creates leading lines that I use here to point the player towards the main door. I also added animated trash blowing in the wind towards the doors to the workshop to subtly suggest where the player should travel; as the player begins to walk into the yard, this animation begins to play.

As the player approaches the yard, they walk through or climb over a sliding metal door. Once inside this door, the building they are attempting to get into is framed directly in front of the player. A large pipe draws the player's attention to a framed, spray painted arrow on a shipping container. While I do not normally use overt arrows in level design, this is something that dying light makes heavy use of, and I wanted to make a level that would seamlessly fit into the vanilla game.

The circuit box pulses in an emissive material until the player interacts with it and is a consistent technique used in the main game and in the level whenever an object is interactable and involves a quest. Once activated, sparks animate on a cable that I ran from the box to the door the box opens; this door is also highlighted by a flashing material until opened. The garage door on the storage unit plays a cinematic of the door opening, and a feedback light turns from red to green.

The pillar the box sits on is illuminated with light and adorned with a bright yellow bandit logo that can be seen from the front entrance of the workshop and from multiple angles. And if all of that is not enough conveyance for where the airdrop is, the word "storage" is sprayed painted on the wall with an upwards arrow under the unit (as mentioned in dialogue), I have included objective markers, and there is a mini map for additional guidance.
I used color consistency to draw the players attention to various objects in the scene. The ladder, upper catwalks, and storage unit catwalks and stairs are red; these red bars also create leading lines and affordances on where the player can traverse. I used yellow flags and sprays to indicate where bandits have been.

Lootable vans in the level also have red doors (as I used red to indicate that something is useable). Additionally, I included a construction cone nearby each van as a classical conditioning technique I learned from studying psychology. The first van has a set of doors that are cracked open and animated tape blowing in the wind on the cone in an effort to teach the player that red van doors can be opened.

I made sure that the player had landmarks to recognize throughout the map (i.e. crane in the distance, large tower near the player path, and smoke rising near the quest giver).

I used a ramp to suggest climbing into the van (an affordance). If the player follows the ramp they will see that the van doors can be opened. If the doors are opened, the player can collect loot. If they are paying attention, they can also collect an access card that allows them to enter the workshop without lockpicking, less risk of being attacked.

All pickups are rotated and framed with additional props to draw the player's eyes toward them. I consistently used green cases for ammo, red cases for health, and yellow cases for lockpicks. These material changes had to be scripted as materials on containers could not be simply swapped in editor. I used pickups to leave breadcrumbs towards goal areas and POIs. For example, in the workshop, I used red medical kits to lure the player down the most central critical path towards the circuit box.

The door to the container is locked; the only way in is by breaking the glass skylight on top. Anything that is permanently locked has chains and a pad lock on it as an anti-affordance. I used a ramp to suggest climbing onto the container (an affordance). In order to give the player a reason to go on top of the container, I have placed a red medical toolbox on top of the container. Once on top, the player can peer through the glass and see more supplies encouraging them to find a way inside.
[COMBAT DESIGN]
Biters are worse in number and are attracted to player noises.
Biters are worse in number and are attracted to player noises.

I placed firecrackers in places that were not on the critical path; these provided a reward for exploration (i.e. the side alley or trash cans). The player can utilize firecrackers to lure zombies near explosives or other fire hazards.
Biters are worse in number and are attracted to player noises.
The workshop yard, side alley, and the interior of the workshop is teeming with slow moving, zombies that cannot climb. The combat in the level begins with the player avoiding these enemies or engaging in melee combat with them. Aside from fists and boots, the player could locate machetes and metal pipes in the yard for a faster kill; the player does not have access to a firearm at this point. Explosive barrels exist in the yard, but cannot be activated without a firearm; they exist for the later half of the level. Once inside the workshop, the player can pick up a shotgun, and the number of zombies increases.
A goal for this project was to create a smaller map that reused space with dynamic gameplay; learning how to do that in this new editor was a challenge. For these reasons, I had to be more intentional about how I placed enemies with firearms (bandits) and when they spawned in to create interesting and dynamic combat with verticality.
Bandits would spawn after the player makes their initial way through the workshop and repossess the stolen airdrop. In this way, the player would escape the same way they entered, but would have to navigate differently to avoid gunshots, in addition to, pre-existing zombies. The above catwalks come in handy and are more visible from the storage units the airdrop is located in. Rifles can be found in the storage units and on the catwalks above.

Ranged, bandit placements with a yellow x.

Ranged, bandit placements with a yellow x.

Ranged, bandit placements with a yellow x.
Ranged, bandit placements with a yellow x.

Using a pillar for cover to attack the player.
Using a pillar for cover to attack the player.
Using a pillar for cover to attack the player.
In addition to the spawn location markers, I set up cover markers near pallet piles, forklifts, shelves, and pillars with a short ai-wander distance. Once the bandits would spawn, they would run to the nearest cover marker and attempt to attack the player. There are twice as many cover markers than AI in order to give the bandits options and to create more spontaneous movement each time the player plays the level.
I had the markers programmed to be initially disabled and scripted them to spawn at specific times during the later half of the quest which made gameplay more dynamic and helped with performance. There are two waves of bandits, and cover markers that spawn in total, in addition to the zombies.
I wanted this combat to feel intense, a level climax. So, I placed destructible and semi-destructible props among the static props in the game. I used clear consistency with these assets so that the player would learn which objects were destructible (dynamic props) and which objects they could rely on for real cover (static props). Crates were destructible with only one projectile shot, Pillars would break off into pieces and never fully destroy. Additionally, exploding barrels would destruct and cause new hazards in the area. The intention was to make the environment feel dynamic with the combat unfolding around them, and to bring a sense of surprise to the player when something broke near them. Combined with enemies spawning in waves from around cover objects, this created the intensity I was looking for.


Rifles and no height advantage
Rifles and no height advantage
I wanted to make sure that the player would experience different angles of gameplay while utilizing the same enemy types and weapons. Once the player escapes the workshop, they are greeted with additional human-enemies, but the player no longer has the height advantage. The player must utilize the cover of pipes, vehicles, and shipping containers, or they must take a risk by climbing on top of these things and exposing themselves to gain the height advantage.
For me, player choice is all about the risk/reward. The player also has the ability to jump the fence and avoid the heavy firefight. By doing so, they are met with a fresh mob of zombies, limited objects to climb on top of, a large fire hazard with narrow escapes, and a bandit in the distance taking shots at the player. This might all be worth it, however, for the large medkit sitting on top of a barrel in the corner.
Optional Side Quest

I wanted the quest object area to stand out in a fun way from the other areas in the level. To do this, I used a purple tinted light inside of the area instead of yellow, engulfed the quest object in an animated green aura, placed a skull decal on the exterior wall, and used an evil looking gate to secure the area. The entire side quest area is also set dressed as a rather 'grim' scene using environmental storytelling.

The player can smash boards to break in to the area, or lockpick the gate around the side of the wall.
I wanted the quest object area to stand out in a fun way from the other areas in the level. To do this, I used a purple tinted light inside of the area instead of yellow, engulfed the quest object in an animated green aura, placed a skull decal on the exterior wall, and used an evil looking gate to secure the area. The entire side quest area is also set dressed as a rather 'grim' scene using environmental storytelling.
At the start of the level, the quest giver mentions a "grim" weapon somewhere in the building that the player can collect for themselves. This creates a running side quest alongside the main quest. Once the weapon is collected (a custom scythe), the side quest completes and the player can use the weapon in game.
To account for different player styles, the player can either lockpick their way into this space or smash boards to break in. I added a skull decal on the wall to draw attention to the wall and area in general. Otherwise, the area is purposefully tucked away under the overhead catwalk, in the back corner of the building, blocked by shelving and other props to offer a bit of a scavenger hunt challenge for the side quest.
I considered how the player might enter this area in general, and made sure that as they approached from any angle, they could clearly see the side quest item even though boards blocked most of the view.
I did this by framing the weapon and green aura through a gap in the broken boards and through the door frame the gate is positioned in. The nearby forklift and boxes also create leading lines toward the entrances to the area. The rubble on the ground creates a trail of breadcrumbs to the space. The boards serve as affordances given that boards can be broken in other parts of the game.

Annotated ( Leading lines depicted in red. Breadcrumbs circled in yellow. Affordance boards circled in blue.)

As seen in game

Funneling, framing, and baiting the player with supplies and the quest object.
Annotated ( Leading lines depicted in red. Breadcrumbs circled in yellow. Affordance boards circled in blue.)
Aesthetic Details & Environmental Storytelling
Whitebox through set Alpha

This scene shows a workshop employee that succumbed to a zombie attack

Whitebox through Beta
Whitebox through set Alpha
I utilized small props and decals to liven up the spaces and make it feel truly lived in. I used a 3 layer approach that I call C.A.K.E.:
1. My goal for layer 1 was to first create the workshop and yard as it was once used. This mostly consisted of workshop shelves, forklifts, and shipping containers full of supplies, food, and papers that one might find at any place of business or a workshop. I also added wall murals and graffiti which is common in many urban areas and helped to make the building feel "lived in" instead of pristine.
2. For layer 2, I added a layer of props and decals that suggest that there was a zombie outbreak that affected this place. I used living zombies, workshop employee bodies, blood decals, and fire hazards to bring this to story to life through out the map.
3. Finally, I added a third layer that suggested that bandits had taken over this space last. In order to ensure this narrative was clear, I made heavy use of the bandit colors and created scenes that suggested odd utilization of a general workshop. The bandit narrative would come through as a workshop being used as a base. I added supply containers with bandit logos on them, decals of the bandit logo spray painted onto plywood and pillars, bandit bodies where they failed at their fight against the zombies, and vehicles with the bandit logo on them. I placed a massive bandit flag on top of the former workshop sign on the front of the building.

Storage unit occupied by bandits for a lounge and indications of a failed defense against the zombies.

Bandit logos on the van and building, and throughout the workshop.
Storage unit occupied by bandits for a lounge and indications of a failed defense against the zombies.

Storytelling here suggests that the wall has been broken and then repaired. There is a hole, boards, rubble, shotgun shells, blood, etc. This involved multiple layers of small props, medium props, and decals.

Storytelling here suggests that the wall has been broken and then repaired. There is a hole, boards, rubble, shotgun shells, blood, etc. This involved multiple layers of small props, medium props, and decals.
Side view of the grim scene. The scene suggests a bandit locked himself in the area but the zombies broke through the wall. All in the area perished due to zombie wounds and shotgun blasts.
Storytelling here suggests that the wall has been broken and then repaired. There is a hole, boards, rubble, shotgun shells, blood, etc. This involved multiple layers of small props, medium props, and decals.
In the Grim Reaper storage scene, I began with the geometry of the space. I choose broken walls and wooden boards plastered onto the hole. I varied the materials on the walls where possible, and for visual effects (VFX), the boards can be smashed and scattered onto the floor; this smashing is accompanied by sound effect (SFX). Next, I added small rubble meshes scattered underneath this hole to show where some of the missing wall went. I also added decals of smaller rubble and dirt onto the floor in this area. Then, I placed the bodies with the assistance of a physics simulation tool in the editor and tried to show the zombies reaching for the exhausted bandit against the wall. To bring this story to life, I placed shotgun shell decals under the guns and around the bandit's body. Lastly, I placed a flickering, hanging lightbulb over the storage area with a slightly purple tint to signify a difference in this space from the others; this area is the side quest item location and is supposed to have a subtly more supernatural vibe than the rest of the level.
I included several points of interest in the level to encourage exploration and provide a little humor and personal flair. With each location, I tried to use environmental storytelling and took time to really think through these additional areas off of the critical path. All locations have extra loot the player can collect.
These locations include:
-
Van accident fractal humor
-
Restroom with zombie in stall
-
Grim Reaper storage no-winners aftermath
-
Office space murder scene
-
Drowning under the tree with loot
-
Bandit with teddy
-
Storage unit bandit lounge
-
Shipping container office
-
Loot truck by the sewer

My goal was to make the player look harder and laugh. The man has clearly been hit by a van, but the funny part is that he is holding a miniature version of himself, who is also holding a mini version of himself, etc. etc.

My goal was to make the player laugh -- or wonder if the bear belonged to a child. Either way, my intent was to produce feelings and emotions.
The office had filing cabinets to explore full of food/health items and provided a safe spot to rest
My goal was to make the player look harder and laugh. The man has clearly been hit by a van, but the funny part is that he is holding a miniature version of himself, who is also holding a mini version of himself, etc. etc.

The restroom is adorned with decals for mold, dirt, blood, and graffiti. The lights flicker and the trash can and toilets have real loot mixed into it. Lighting in the restroom has a slightly green tint as well to indicate that its a dingy environment. Lastly, I placed an sound effects (SFX) volume into the restroom to change the atmosphere to a more echoey vibe with dripping water.
The restroom is adorned with decals for mold, dirt, blood, and graffiti. The lights flicker and the trash can and toilets have real loot mixed into it. Lighting in the restroom has a slightly green tint as well to indicate that its a dingy environment. Lastly, I placed an sound effects (SFX) volume into the restroom to change the atmosphere to a more echoey vibe with dripping water.
The restroom is adorned with decals for mold, dirt, blood, and graffiti. The lights flicker and the trash can and toilets have real loot mixed into it. Lighting in the restroom has a slightly green tint as well to indicate that its a dingy environment. Lastly, I placed an sound effects (SFX) volume into the restroom to change the atmosphere to a more echoey vibe with dripping water.
After I was certain that my gameplay was solid, I added aesthetic detail to the level. Aesthetics is a strong skillset of mine, and I am always sure to dedicate ample time to making sure my levels not only play great, but look great (if I am responsible for aesthetics). In each scene, I tried to incorporate several layers of aesthetic passes.
For example, in the restroom area, I placed realistic looking decals on the walls and modified the lighting to look different than other spaces, giving it a moldy appearance.
I made sure to do a full audio pass on the level for player immersion; combined with the visual effects (VFX) I added, I was able to bring environments to life.
For example, in addition to the animated grass and gunk hanging off of the sewer grate, several other things were added to this sewer pipe. First, I added a particle system with dripping water and a water volume at the base of the pipe. I added a second water volume outside of the pipe on the ground which creates a splashing sound effect (SFX) when the player stands on it. I inserted a sound cue inside of the pipe to create sound effects (SFX) for the dripping water in an echoey space. Lastly, I placed trash decals under the water volumes and places a few trash mesh pieces on top of the water to give it depth.
Using the audio files from the base game, I was able to create audio zones for different areas of my map.
For example, in the video here, I show the differences in environmental audio zone changes as the player moves from the restroom, to the workshop, and to a storage unit.
All three zones have different ambient audio. The outdoors also has different audio then the workshop.

Players can stand on large objects in the yard. For this reason, I needed to make the facility seem bigger than it was, and make the permitter seem like a lively city. Here, I placed a sleeping bag in a rail cart on tracks.

Here, I tried to tell the story that the quest giver and player drove here in a buggy and used a ladder and a blanket to jump the fence. I was careful to make this area look as polished as the rest of the level.
I added foggy visual effects (vfx) and darker world lighting to give the atmosphere a gloomy, late in the day vibe.
Players can stand on large objects in the yard. For this reason, I needed to make the facility seem bigger than it was, and make the permitter seem like a lively city. Here, I placed a sleeping bag in a rail cart on tracks.
I surrounded the entire map with surrounding cityscapes, trees, and high walls. In any direction the player looks, I took care to make sure that they were full immersed. Because the player might spend considerable time looking out into this nonplayable space through parkouring, I made sure the nonplayable space looked realistic within reason; the closer the environment was to the player's location, the more realistic it looked.